Set up a Google Analytics 4 Funnel
Funnel exploration in Google Analytics 4 lets you visualize the steps your users take to complete a task and quickly see how well they are succeeding or failing at each step. For example, how are your fans proceeding through a Paylogic Shop and become buyers?
In this guide we’ll explain to you how you can set up a funnel for a single Paylogic shop or for multiple shops at once, which can be useful if you use the same GA4 measurement ID for a lot of different events.
Funnel for a single Paylogic Shop
When you are on the homepage of your GA4 property select ‘Explore’ in the menu bar on the left.
In the next screen select ‘Funnel Exploration’.
You are guided to the next screen and will see that Google has already pre filled some steps. Remove these steps.
Click the ‘MAKE OPEN FUNNEL’ toggle, so that it’s enabled.
Now click the pencil icon in the ‘Steps’ section.
Here you can add all the different steps of the buying process in a Paylogic Shop. As an example we will take our demo Shop: https://shop.paylogic.com/094a04f823654cb3a7c2cd39386546b9/tickets
Our shops have a few default steps that every shop has (add to cart, shopping cart page, checkout page, purchase), but as you may know you can add pages to the shop yourself as well or even include a questionnaire which can be seen in the demo shop.As a first step we’ll add the landing page of the shop, which in this case is https://shop.paylogic.com/094a04f823654cb3a7c2cd39386546b9/tickets. Do this as following:
Give the step a name, like for example the name of the page. In this case ‘Tickets’.
Click ‘Add new condition’.
Select ‘Events’ and then click ‘page_view’.
Now click the ‘Add parameter’ button, select ‘Other’ and click ‘page_location’.
A window opens for the condition of the page_view. Add the URL of your landing page in the empty field.
Click ‘Apply’.
You have created your first step. The rest of the steps can be done in a similar way. As an example you can see below that for the demo shop the steps would look like this:
Accommodation: Events > page_view | Parameter > Other > page_location > https://shop.paylogic.com/094a04f823654cb3a7c2cd39386546b9/accommodation
Merchandise: Events > page_view | Parameter > Other > page_location > https://shop.paylogic.com/094a04f823654cb3a7c2cd39386546b9/merchandise
Extra’s: Events > page_view | Parameter > Other > page_location > https://shop.paylogic.com/094a04f823654cb3a7c2cd39386546b9/extras
Shopping cart: Events > page_view | Parameter > Other > page_location > https://shop.paylogic.com/094a04f823654cb3a7c2cd39386546b9/shopping-cart
Questionnaire: Events > page_view | Parameter > Other > page_location > https://shop.paylogic.com/094a04f823654cb3a7c2cd39386546b9/questions
Checkout: Events > page_view | Parameter > Other > page_location > https://shop.paylogic.com/094a04f823654cb3a7c2cd39386546b9/checkout
Purchase: Events > purchase | Parameter > Other > page_location ‘contains > 094a04f823654cb3a7c2cd39386546b9
Note: As you can see the purchase event is a bit different from the other steps. You can use the ‘purchase’ event and in page_location you only provide the sale UID of your shop, because the full URL of a completed order will differ per fan.
Confirm your steps by clicking ‘Apply’ in the top right corner.
You have successfully created your funnel and will see the data on the right.


Funnel for a multiple Paylogic Shops
A funnel for multiple Paylogic Shops can be useful if you use one GA4 measurement ID for a lot of different events at the same time. For example for clubs or concert halls, where every shop has the same set up and same amount of pages.
When you are on the homepage of your GA4 property select ‘Explore’ in the menu bar on the left.
In the next screen select ‘Funnel Exploration’.
You are guided to the next screen and will see that Google has already pre filled some steps. Remove these steps.
Click the ‘MAKE OPEN FUNNEL’ toggle, so that it’s enabled.
Now click the pencil icon in the ‘Steps’ section.
Here you can add all the different steps of the buying process in a Paylogic Shop. As a first step we’ll add the landing page of the shops. Do this as following:
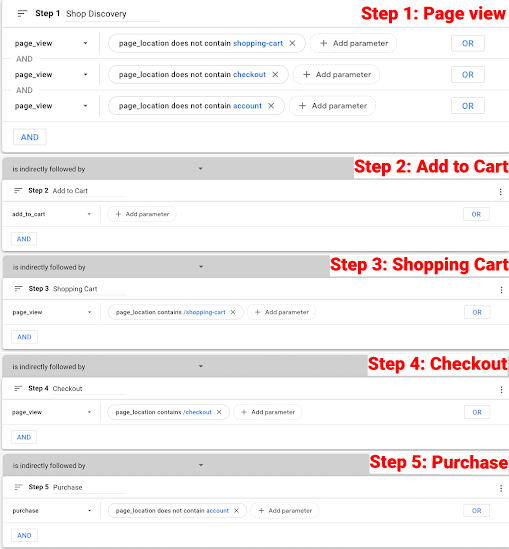
Give the step a name, like for example in this case ‘Discovery’
Click ‘Add new condition’
Select ‘Events’ and then click ‘page_view’
Now click the ‘Add parameter’ button, select ‘Other’ and click ‘page_location’
A window opens for the condition of the page_view. What you want to do is to make sure you are only including pages with products and not including pages from other steps or other applications than the shop. Therefore select ‘Does not contain’ as condition and fill in ‘shopping-cart’ in the empty value field.
Click ‘Apply’
Repeat this for ‘checkout’ and ‘account’, so that you will have 3 conditions for your first step.
As step 2 you can add ‘Add to Cart, which is the event when a fan adds a product to his cart in a shop.
Click ‘Add new condition’
Select ‘Events’ and then click ‘add_to_cart’
Step 3: Shopping Cart -> page_location contains /shopping-cart
Step 4: Checkout -> page_location contains /checkout
Step 5: Purchase -> page_location does not contain account
Confirm your steps by clicking ‘Apply’ in the top right corner.
You have successfully created your funnel and will see the data on the right.

Related Articles
Create a Google Analytics 4 funnel
With Funnel exploration in Google Analytics 4 you can visualize the steps your users take to complete a task and quickly see how well they succeed or fail at each step. For example, how do your fans move through a Paylogic shop and become buyers? In ...A goal funnel for the Paylogic shop
To correctly set up a Goal Funnel for a Paylogic shop, you need to follow the steps below. Step 1: Create a new goal Step 2: Custom goal configuration Step 3: Goal description name + type Step 4.1 General funnel for all shops The steps within a Goal ...Create a Google Analytics 4 property
Configure Google Analytics 4 in the Paylogic backoffice Go to the event you want to track with Google Analytics 4 and go to theMarketing Tags menu. Select the Google Analytics 4 tag. In the 'Google Analytics Measurement ID' field, enter the ...Server-side Tracking
With our server-side tracking solution, we help you gain better insight into the online behavior of your fans, so you better understand how your marketing campaigns are performing and how they move through your ticket shop. Unlike traditional ...Identify fan behavior on your online channels
Our marketing tags feature makes it very easy to place different pixels in your shop. This can help you identify the behaviour of fans on your website. You can read how to do that below, after a short introduction to the different pixels. The ...